# 解析图片的瀑布流(含懒加载)原理,并搭配服务端交互数据

# 前言
瀑布流是一种很常见的网页图片交互方式,效果可以参考 花瓣网 (opens new window)。
# 准备工作
首先来查看一下目录结构,其中app.js为服务端启动文件,主要用来提供接口,返回所需的图片数据,index.html为瀑布流页面。
├── app.js
├── index.html
├── package.json
├── node_modules/
服务端app.js利用express搭建本地服务器,其中访问http://127.0.0.1:3000默认返回瀑布流页面,获取图片接口一般是以pageNo和pageSize的分页模式,由于仅是提供简单的数据服务,根据请求参数返回图片列表即可,不必太多纠结逻辑,注意图片数量一般有限,假定大于300则不再返回数据只返回空数组。
// app.js
const express = require('express')
const fs = require('fs')
const app = new express()
const port = 3000

app.get('/', (req, res) => {
  fs.readFile('./index.html', 'UTF-8', (err, data) => {
    if (err) return '404 not found'

    res.send(data)
  })
})

app.get('/imgs', (req, res) => {
  const { pageSize, pageNo } = req.query
  const lists = []
  const total = 300

  for (var i = 0; i < pageSize; i++) {
    lists.push('http://127.0.0.1/images/img.png')
  }

  res.send({
    pageNo,
    pageSize,
    total,
    lists: pageNo * pageSize > total ? [] : lists,
  })
})

app.listen(port, () => {
  console.log(`app is running at http://127.0.0.1:${port}/`)
})
;index.html页面内,为了支持IE9及以上浏览器,Promise需引入第三方CDN,同时页面ajax请求需要用到axios库,另外页面所有函数均为普通函数,变量声明也仅用var,别问为什么,问就是兼容IE。
<head>
  <meta charset="UTF-8">
  <title>waterfall</title>
  <script src="promise-polyfill.js"></script>
  <script src="axios.js"></script>
</head>
;CSS中将waterfall块水平居中,内部item元素加了阴影,效果上会更加好一点。
<style>
  body {
    margin: 0;
    min-width: 600px;
  }

  #waterfall {
    margin: 16px auto;
    position: relative;
  }

  .item {
    width: 230px;
    border-radius: 10px;
    position: absolute;
    box-shadow: rgba(0, 0, 0, 0.24) 0px 3px 8px;
  }

  #msg {
    font-size: 18px;
    font-weight: bold;
    text-align: center;
    margin: 0;
    height: 80px;
    line-height: 80px;
    color: #3d3d3d;
  }
</style>

<div id="waterfall"></div>
<p id="msg">正在加载中...</p>
# 工具函数
;js部分包括很多工具类函数,接下来逐个详述。
# getRandomInt
;getRandomInt函数用于获取指定范围内的随机整数,包括两端的边界值在内。
function getRandomInt(min, max) {
  return Math.floor(Math.random() * (max - min + 1)) + min
}
# getRandomHeight
;getRandomHeight获取随机高度,介于200到500之间,几百张高度不一致的图片不太好收集,利用随机数模拟即可。
function getRandomHeight() {
  return getRandomInt(200, 500) + 'px'
}
# getRandomColor
;getRandomColor获取随机背景色,包括透明度,介于为0.1到1之间。
function getRandomColor() {
  return 'rgba(' + getRandomInt(0, 255) + ', ' + getRandomInt(0, 255) + ', ' + getRandomInt(0, 255) + ', ' + getRandomInt(1, 10) / 10 + ')'
}
# createItem
;createItem用于创建div元素项,由于图片地址不可用,所以代码中注释了,元素项的高度和背景色根据上述其它工具函数生成。
function createItem(src) {
  var div = document.createElement('div')

  // var img = document.createElement('img')
  // img.src = src
  // div.appendChild(img)

  div.className = 'item'
  div.style.background = getRandomColor()
  div.style.height = getRandomHeight()

  return div
}
# request
;request用户请求获取图片,其中params为pageNo和pageSize。
function request(params) {
  return new Promise(function (resolve, reject) {
    axios({
      url: 'http://127.0.0.1:3000/imgs',
      params: params,
    }).then(function (res) {
      resolve(res.data)
    })
  })
}
# debounce
;debounce防抖函数,用于限制触发频率,取个参数列表还把数组原型抬出来了,因为要兼容IE。
function debounce(fn, delay) {
  delay = delay || 100
  var timer = null

  return function () {
    var args = Array.prototype.slice.apply(arguments)

    if (timer) {
      clearTimeout(timer)
      timer = null
    }

    timer = setTimeout(function () {
      fn.apply(this, args)
    }, delay)
  }
}
# 原理部分
瀑布流内部的元素要形成交错的样式风格,只能通过定位实现,因此外层waterfall需要相对定位,内部元素需要绝对定位。
# getCols
然后再确定页面具体显示几列,其中width为元素项宽,gap为项与项之间的间隙。其中n * width + (n - 1) * gap为多列元素项所占宽度,应默认小于body的宽度,但是body左右需要留部分间隙,因此默认小于bodyWidth - margin * 2。调整等式,再通过~~(类似parseInt)取整即可。
function getCols() {
  // n * width + (n - 1) * gap <= bodyWidth - margin * 2
  return ~~((document.body.offsetWidth - 32 + gap) / (width + gap))
}
瀑布流的最根本原理就是,首行铺满元素后,后续元素均定位在高度最小的列的后面,依次往后定位铺满。因此全局下需要维护heights数组,用于存放每一列的当前高度。

# getMinIndex
;getMinIndex用于获取heights数组中值最小的列的索引。
function getMinIndex(array) {
  var min = Math.min.apply(null, array)

  return array.indexOf(min)
}
# setWaterFallRect
注意由于外层waterfall块和内层元素定位的原因,内层元素脱离文档流,造成外层高度塌陷了。因此需要根据列数和heights共同设置外层元素的宽高。
function setWaterFallRect() {
  var wf = document.querySelector('#waterfall')
  var max = Math.max.apply(null, heights)

  wf.style.height = max + 'px'
  wf.style.width = width * cols + (cols - 1) * gap + 'px'
}
# waterfall
;waterfall函数即实现上述功能,首行铺满同时填充高度值到heights中,后续的元素需要判断heights数组中值最小的索引,计算出left和top定位值并应用于当前元素。for循环结束所有的元素项布局定位完成,此时再更新外层waterfall块的宽高。
注意for循环中变量i初始值为loaded,loaded用于对已经完成布局定位的元素计数。因为需要配合懒加载,每次懒加载新增元素时,都只对新增的元素进行布局定位,而之前的元素则不再布局,以此来优化性能。
function waterfall() {
  cols = getCols()
  var items = document.querySelectorAll('#waterfall .item')

  for (var i = loaded; i < items.length; i++) {
    var item = items[i]
    var height = item.offsetHeight

    if (i < cols) {
      item.style.top = 0
      item.style.left = i * (width + gap) + 'px'
      heights.push(height)
    } else {
      var minIndex = getMinIndex(heights)
      var top = heights[minIndex] + gap

      item.style.top = top + 'px'
      item.style.left = minIndex * (width + gap) + 'px'
      heights[minIndex] = top + height
    }

    loaded++
  }

  setWaterFallRect()
}
# 实现部分
基础的工具函数和功能函数都已经完成,首先需要初始化整个瀑布流界面,其中isReq用作节流阀,后面接入懒加载时,滚动条触发过于频繁,若接口处于请求过程中,则不再请求。
;total用于记录请求的图片总数,每次请求成功分页码加1,下次请求则请求下一页的数据。
;createDocumentFragment用于将创建的DOM元素加入到文档片中,待所有的DOM创建完成并加入到文档片中时,再将文档片一次性插入到waterfall块中。
常规的方式是创建完元素就append到waterfall中,但是每次插入都会造成页面重排,而由于createDocumentFragment存在于内存中,不在DOM树中,因此将文档片插入到waterfall块中时页面仅仅重排一次。
function init() {
  if (isReq) return
  isReq = true

  request(params).then(function (res) {
    var lists = res.lists
    var frag = document.createDocumentFragment()

    total = res.total
    isReq = false
    params.pageNo++

    for (var i = 0; i < lists.length; i++) {
      frag.appendChild(createItem(lists[i]))
    }

    document.querySelector('#waterfall').appendChild(frag)

    waterfall()
  })
}
# 懒加载
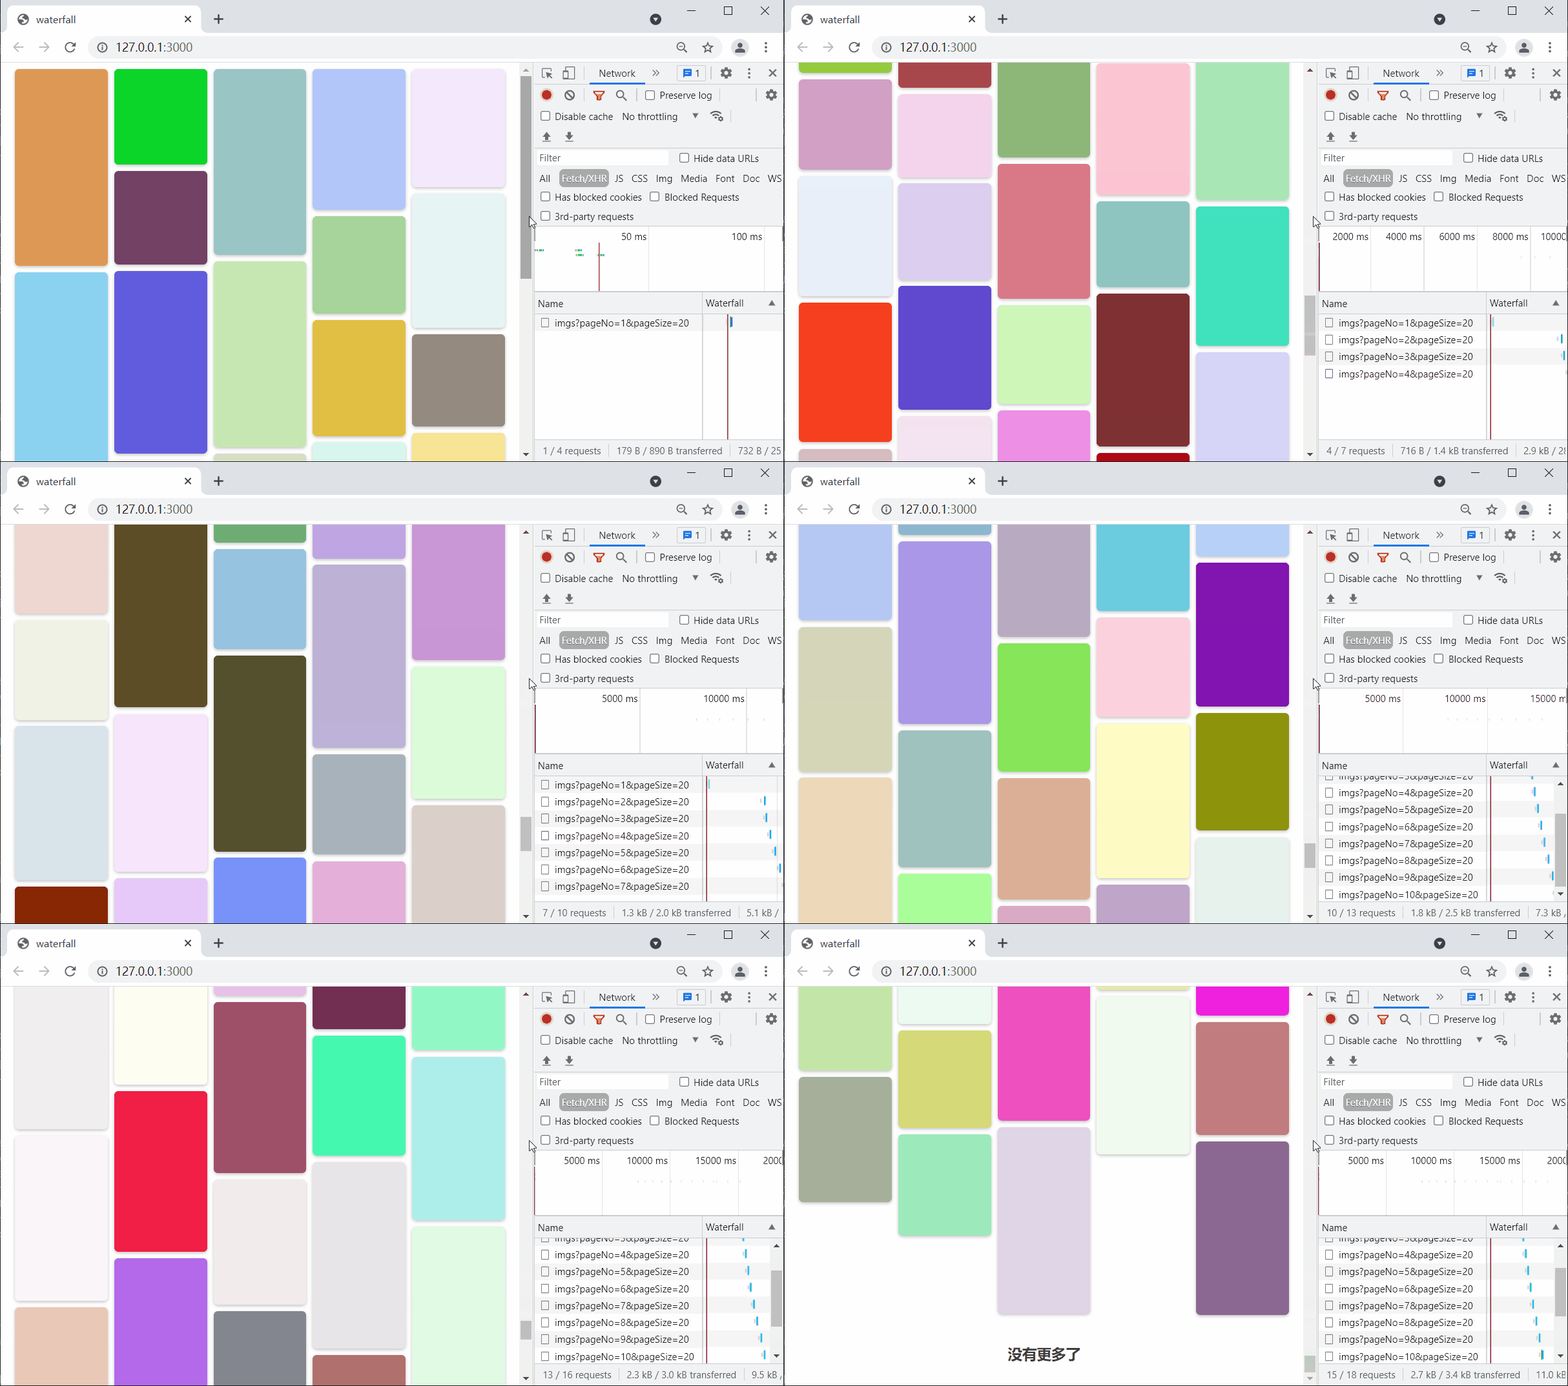
;window绑定滚动条事件,每次滚动都会触发lazyLoad懒加载。
注意文档未显示的内容高度为documentHeight - scrollTop - clientHeight,一般此部分高度小于窗口高度的一半就加载新的数据。
满足此条件的同时,若完成布局的元素数量loaded大于或者等于请求的图片数量total,即表示服务端返回的数据已经全部加载完成,不用再请求数据,因此注销滚动条事件。
为什么此处不用做滚动条防抖呢?原因在于init函数做了节流处理,即便是init频繁触发,获取图片的请求也最多只会有一个。
window.addEventListener('scroll', lazyLoad)

function lazyLoad() {
  var scrollTop = document.documentElement.scrollTop || document.body.scrollTop
  var documentHeight = document.documentElement.scrollHeight
  var clientHeight = window.innerHeight

  // documentHeight - scrollTop - clientHeight < 0.5 * clientHeight
  if (documentHeight - scrollTop < 1.5 * clientHeight) {
    if (loaded >= total) {
      document.querySelector('#msg').innerText = '没有更多了'
      window.removeEventListener('scroll', lazyLoad)
      return
    }

    init()
  }
}
# 响应式
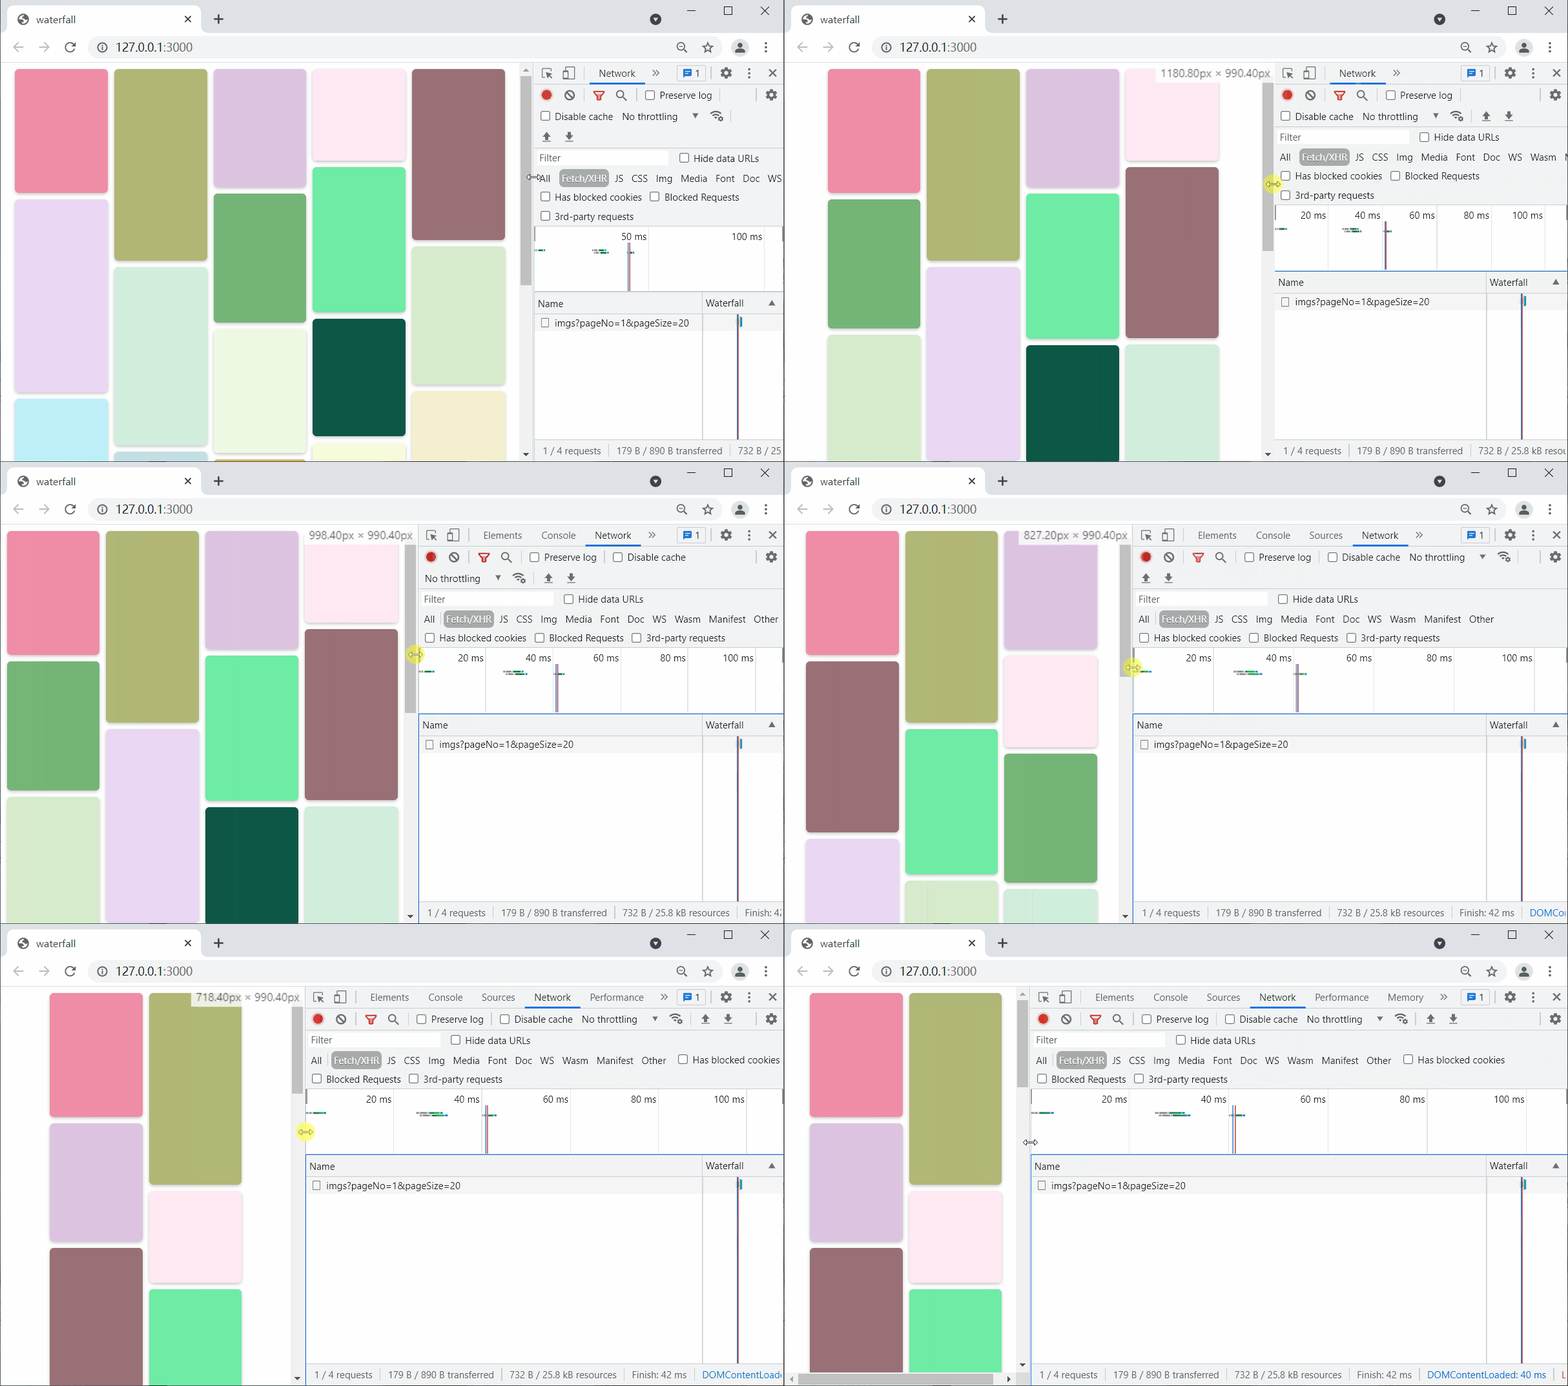
在此基础上再做一个响应式功能,即浏览器窗口宽度改变,动态切换列数。
窗口宽度改变后,整个页面的元素项需要重新布局,因此loaded和heights都要重置。
窗口宽度低于body的最小宽度无需重新布局,即无论窗口如何改变,至少显示两列。
window.addEventListener('resize', debounce(resize, 50))

function resize() {
  if (document.body.offsetWidth < 600) return

  loaded = 0
  heights = []
  waterfall()
}
# 完整代码
;axios (opens new window) 和 promise-polyfill (opens new window) 下载本地或CDN引入都可。
// index.html
<!DOCTYPE html>
<html lang="en">

<head>
  <meta charset="UTF-8">
  <title>waterfall</title>
  <script src="promise-polyfill.js"></script>
  <script src="axios.js"></script>
  <style>
    body {
      margin: 0;
      min-width: 600px;
    }

    #waterfall {
      margin: 16px auto;
      position: relative;
    }

    .item {
      width: 230px;
      border-radius: 10px;
      position: absolute;
      box-shadow: rgba(0, 0, 0, 0.24) 0px 3px 8px;
    }

    #msg {
      font-size: 18px;
      font-weight: bold;
      text-align: center;
      margin: 0;
      height: 80px;
      line-height: 80px;
      color: #3d3d3d;
    }
  </style>
</head>

<body>
  <div id="waterfall"></div>
  <p id="msg">正在加载中...</p>

  <script>
    (function () {
      function getRandomInt(min, max) {
        return Math.floor(Math.random() * (max - min + 1)) + min
      }

      function getRandomHeight() {
        return getRandomInt(200, 500) + 'px'
      }

      function getRandomColor() {
        return "rgba(" + getRandomInt(0, 255) + ", " + getRandomInt(0, 255) + ", " + getRandomInt(0, 255) + ", " + getRandomInt(1, 10) / 10 + ")"
      }

      function createItem(src) {
        var div = document.createElement('div')

        // var img = document.createElement('img')
        // img.src = src
        // div.appendChild(img)

        div.className = 'item'
        div.style.background = getRandomColor()
        div.style.height = getRandomHeight()

        return div
      }

      function request(params) {
        return new Promise(function (resolve, reject) {
          axios({
            url: 'http://127.0.0.1:3000/imgs',
            params: params,
          }).then(function (res) {
            resolve(res.data)
          })
        })
      }

      function debounce(fn, delay) {
        delay = delay || 100
        var timer = null

        return function () {
          var args = Array.prototype.slice.apply(arguments)

          if (timer) {
            clearTimeout(timer)
            timer = null
          }

          timer = setTimeout(function () {
            fn.apply(this, args)
          }, delay)
        }
      }

      function getCols() {
        // n * width + (n - 1) * gap <= bodyWidth - margin * 2
        return ~~((document.body.offsetWidth - 32 + gap) / (width + gap))
      }

      function getMinIndex(array) {
        var min = Math.min.apply(null, array)

        return array.indexOf(min)
      }

      function setWaterFallRect() {
        var wf = document.querySelector('#waterfall')
        var max = Math.max.apply(null, heights)

        wf.style.height = max + 'px'
        wf.style.width = width * cols + (cols - 1) * gap + 'px'
      }

      function waterfall() {
        cols = getCols()
        var items = document.querySelector('#waterfall .item')

        for (var i = loaded; i < items.length; i++) {
          var item = items[i]
          var height = item.offsetHeight

          if (i < cols) {
            item.style.top = 0
            item.style.left = i * (width + gap) + 'px'
            heights.push(height)
          } else {
            var minIndex = getMinIndex(heights)
            var top = heights[minIndex] + gap

            item.style.top = top + 'px'
            item.style.left = minIndex * (width + gap) + 'px'
            heights[minIndex] = top + height
          }

          loaded++
        }

        setWaterFallRect()
      }

      function init() {
        if (isReq) return
        isReq = true

        request(params).then(function (res) {
          var lists = res.lists
          var frag = document.createDocumentFragment()

          total = res.total
          isReq = false
          params.pageNo++

          for (var i = 0; i < lists.length; i++) {
            frag.appendChild(createItem(lists[i]))
          }

          document.querySelector('#waterfall').appendChild(frag)

          waterfall()
        })
      }

      function lazyLoad() {
        var scrollTop = document.documentElement.scrollTop || document.body.scrollTop
        var documentHeight = document.documentElement.scrollHeight
        var clientHeight = window.innerHeight

        // documentHeight - scrollTop - clientHeight < 0.5 * clientHeight
        if (documentHeight - scrollTop < 1.5 * clientHeight) {
          if (loaded >= total) {
            document.querySelector('#msg').innerText = '没有更多了'
            window.removeEventListener('scroll', lazyLoad)
            return
          }

          init()
        }
      }

      function resize() {
        if (document.body.offsetWidth < 600) return

        loaded = 0
        heights = []
        waterfall()
      }

      var width = 230

      var gap = 16

      var loaded = 0

      var cols = 0

      var params = {
        pageNo: 1,
        pageSize: 20,
      }

      var total = 0

      var heights = []

      var isReq = false

      init()

      window.addEventListener('scroll', lazyLoad)

      window.addEventListener('resize', debounce(resize, 50))
    })()
  </script>
</body>

</html>
# 效果图
# 懒加载

# 响应式

# 🎉 写在最后
🍻伙伴们,如果你已经看到了这里,觉得这篇文章有帮助到你的话不妨点赞👍或 Star (opens new window) ✨支持一下哦!
手动码字,如有错误,欢迎在评论区指正💬~
你的支持就是我更新的最大动力💪~
GitHub (opens new window) / Gitee (opens new window)、GitHub Pages (opens new window)、掘金 (opens new window)、CSDN (opens new window) 同步更新,欢迎关注😉~
