# 万字长文系统梳理 Webpack 基础(上)

# Webpack 简介
# 概述
;webpack是一个开源的JavaScript模块打包工具,核心功能是解决模块之间的依赖,把各个模块按照特定规则和顺序组织在一起,最终合并为一个或者多个JS文件,整个过程被称为模块打包。
模块即一个日期处理的npm包或者一个提供工具方法的JS文件等。设计程序结构时,将所有代码堆砌到一起会非常糟糕,更好的方式是按照特定的功能将其拆分为多个代码段,每个代码段实现一个特定的功能,最后再通过接口将其组合。
;JavaScript设计初仅是小型的脚本语言,远没有考虑到会用其实现复杂的场景,模块化也就显得多余了。伴随技术的发展,HTML页面中通常会引入多个script文件,但是此做法有很多缺陷。
首先需手动维护script文件的加载顺序。页面的多个script之间通常会有依赖关系,这些依赖关系一般是隐式的,不添加注释很难清晰地指明谁依赖谁,并且加载文件过多时很容易出现问题。
其次是每一个script文件都意味着向服务器请求一次静态资源,过多的请求会拖慢网页的渲染速度。并且每个script标签中顶层作用域即全局作用域,直接在代码中进行变量或函数声明,会造成全局作用域的污染。
而模块化方式则通过导入和导出语句可以清晰地看到模块间的依赖关系。模块可以借助工具进行打包,在页面中只加载合并后的资源文件,以此减小网络开销。并且多个模块之间的作用域是隔离的,彼此不会有命名冲突。
# 安装
;webpack安装方式包括全局安装和本地安装,全局安装会绑定一个命令行环境变量,一次安装、处处运行。本地安装则会添加其成为项目的依赖,只能在项目内部使用。
若采用全局安装,在项目多人协作时,由于每个人系统中的webpack版本不同,可能导致输出结果不一致。并且部分依赖于webpack的插件会调用项目内部的webpack模块,此种情况下仍然需要本地安装webpack。
安装指定版本的webpack,注意webpack4+版本需安装webpack-cli命令行工具。
npm i webpack@4.29.4 webpack-cli@3.2.3 --save-dev
安装成功后可查看webpack和webpack-cli版本号。注意webpack安装在本地,因此无法在命令行内使用webpack指令,项目内部只能使用npx webpack的形式。
npx webpack -v
npx webpack-cli -v
# 打包
根目录下创建index.html、index.js、fn.js。
// index.html
<!DOCTYPE html>
<html lang="zh-CN">

  <head>
    <meta charset="UTF-8">
    <title>Hello World</title>
  </head>

  <body>
    <script src="./dist/bundle.js"></script>
  </body>

</html>

// index.js
import fn from './fn.js'

fn()

// fn.js
export default function () {
  document.write('Hello World')
}
控制台运行如下打包命令,浏览器打开index.html显示Hello World。其中entry为资源打包的入口,webpack由此开始进行模块依赖的查找,获取到项目中index.js和fn.js两模块,output-filename为输出资源名,打包后出现dist目录下bundle.js文件,mode为打包模式,包括development、production、none三种模式,开发环境一般为development模式。
可运行npx webpack -h查看webpack配置项以及相应的命令行参数。
npx webpack --entry=./index.js --output-filename=bundle.js --mode=development
每次打包都要输入一段冗长的命令,可编辑package.json文件,添加脚本命令简化输入。其中scripts是npm提供的脚本命令功能,可直接使用由模块所添加的指令(如webpack取代之前的npx webpack),运行npm run build然后再打开index.html。
{
  ...
  "scripts": {
    "build": "webpack --entry=./index.js --output-filename=bundle.js --mode=development"
  }
  ...
}
当项目需要的配置越来越多时,命令中则要添加更多的参数,后期维护非常困难。webpack的默认配置文件为webpack.config.js,然后再去掉package.json中配置的打包参数。
// webpack.config.js
module.exports = {
  entry: './index.js',
  output: {
    filename: 'bundle.js',
  },
  mode: 'development',
}

// package.json
{
  ...
  "scripts": {
    "build": "webpack"
  }
  ...
}
当修改代码时需要重新执行npm run build打包再打开index.html,webpack提供了更加便捷的开发工具 webpack-dev-server (opens new window) 提高开发效率,当其发现项目源文件进行了更新操作就会自动刷新live-reloading浏览器,显示更新后的内容。
npm i webpack-dev-server@3.1.14 --save-dev
添加dev脚本并配置webpack.config.js。webpack-dev-server主要工作是将打包结果放在内存中,并不会实际写入文件,每次webpack-dev-server接收到请求时都只是将内存中的打包结果返回给浏览器。可通过删除dist目录来验证,即便dist目录不存在,刷新页面功能仍然是正常的。
// package.json
{
  ...
  "scripts": {
    "dev": "webpack-dev-server",
    "build": "webpack"
  }
  ...
}

// webpack.config.js
module.exports = {
  ...
  devServer: {
    publicPath: '/dist',
  },
}
# 模块
# CommonJs
;node.js将javascript语言用于服务端编程,由于在服务器端要与操作系统和其他应用程序互动,模块化是必需的,同时node.js采用了部分commonjs的规范并在其基础上进行了一些调整。
有了服务端模块以后,客户端模块也由此开始发展。但是服务端与客户端的模块存在较大差异,服务端所有的模块都存放在本地硬盘,可以同步加载完成,等待时间就是硬盘的读取时间,但是对于浏览器,会存在一个非常严重的问题,由于模块都在服务端,等待时间就取决于网速的快慢,若等待时间较长,浏览器就会处于假死状态。因此,浏览器端的模块,不能采用同步加载,只能采用异步加载。
导出是一个模块向外暴露自身的唯一方式,commonjs中通过exports或者module.exports导出模块中的内容。其内部机制将exports指向了module.exports,而module.exports在初始化时为空对象。可以理解为commonjs在每个模块的首部默认添加了如下代码。注意不要直接给exports赋值,会导致其指向断裂,也不要两者混合运用。另外导出语句不代表模块的末尾,在exports或者module.exports后面的代码会照常执行,但是通常将其放在模块的末尾。
var module = {
  exports: {},
}
var exports = module.exports
;commonjs中使用require导入模块,require导入分为两种情况,若模块是第一次被导入,会执行其内部代码,同时导出指定的内容,若模块已被导入过,模块内部代码不会再执行,而是直接导出上次执行后得到的结果。
模块内部module对象有一个属性loaded用于记录此模块是否被加载过,默认值为false,当模块第一次被加载或执行后会置为true,再次加载检查到module.loaded为true时将不会再执行。如下执行node index.js将输出false true。
// func.js
console.log(module.loaded)
module.exports = function () {
  return module.loaded
}

// index.js
const func = require('./func.js')

console.log(func())
# ES6 Module
;ES6 Module也是将每个文件作为一个模块,每个模块拥有自身的作用域,不同的是导入、导出语句。ES6 Module会自动采用严格模式,不管模块开头是否有'use strict',都会采用严格模式。
导出模块包括默认导出和命名导出,导入命名导出的模块需要解构出变量,导入默认导出的模块任意变量名均可接收。注意导入变量的效果相当于在当前作用域下声明了此变量,并且不可对其修改,也就是所有导入的变量都是只读的。
# CommonJS 与 ES6 Module 区别
两者最本质的区别在于CommonJs对模块的依赖是动态的,即模块依赖关系的建立发生在代码运行阶段,而ES6 Module对模块的依赖则是静态的,即模块依赖关系的建立发生在代码编译阶段。
;CommonJs的模块路径可以动态指定,支持传入表达式,也可以通过if语句判断是否加载某个模块。因此,在CommonJs模块被执行前,并没有办法确定明确的依赖关系,故模块导入、导出发生在代码的运行阶段。
;ES6 Module导入、导出语句均为声明式,不支持导入路径为表达式,且导入、导出语句必须位于模块的顶层作用域。即ES6 Module是一种静态的模块结构,在ES6代码编译阶段就能分析出模块的依赖关系。
;ES6 Module相对于CommonJS具备如下优势。
- 死代码检测和排除,可以用静态分析工具检测出哪些模块没有被调用过。引用工具类库时,工程中一般只用到一部分组件或接口,可能会将其完全加载进来,而未被调用的模块代码永远不会执行,成为死代码。静态分析工具可以在打包时去掉未曾使用过的模块,以减小打包资源体积
- 模块变量类型检查,
ES6 Module的静态模块结构有助于确保模块之间传递的值或接口类型是正确的 - 编译器优化,
ES6 Module支持直接导入变量,减少引用层级,程序效率更高
# 拷贝与绑定
若CommonJs的module.exports导出的是基本数据类型,则导入时只是值的拷贝。如下运行后输出结果为1 1 2,由于index.js中的count是对add.js中的count的值的拷贝,调用add函数时,虽然改变了add.js中count的值,但是并不会对导入时创建的count拷贝造成影响。
// add.js
var count = 1

module.exports = {
  count,
  add() {
    count++
  },
  get() {
    return count
  }
}

// index.js
const { count, add, get } = require('./add.js')

console.log(count)
add()
console.log(count)
console.log(get())
若module.exports导出的是引用数据类型,则导入时是引用的拷贝。如下运行后输出结果为{count: 1} {count: 2} true,由于index.js中的object是对add.js中的object的引用的拷贝,调用updateObject改变了add.js中object.count的值,则index.js中object.count也会随之改变。
// add.js
const object = {
  count: 1
}

module.exports = {
  object,
  updateObject() {
    object.count++
  },
  getObject() {
    return object
  }
}

// index.js
const { object, updateObject, getObject } = require("./add.js")

console.log(object)
updateObject()
console.log(object)
console.log(getObject() === object)
;ES6 Module导入的变量始终指向的是模块内部的变量,使用时可以获得变量的最新值。如下运行后输出结果为1 2 2,index.js中的count与add.js中的count之间建立了一种绑定关系(binding),可实时获取到绑定的最新值。
// add.js
export var count = 1
export function add() {
  count++
}
export function get() {
  return count
}

// index.js
import { count, add, get } from "./add.js"

console.log(count)
add()
console.log(count)
console.log(get())
注意export default是不会产生绑定关系的,如下运行后输出结果为1 1 2。
// add.js
var count = 1

export default count
export function add() {
  count++
}
export function get() {
  return count
}

// index.js
import count, { add, get } from "./add.js"

console.log(count)
add()
console.log(count)
console.log(get())
首先export default是一种语法糖,当模块只有一个导出的时候简化代码量。如下为export default导出原始类型变量count。
var count = 1

export default count
然后JavaScript会将变量count交给内部变量*default*,然后再重命名为default导出。
var count = 1
var *default* = count

export { *default* as default }
之前export default不会产生绑定关系的原因也即是由于语法糖的转换造成的,index.js中的count实际上绑定的是add.js中的内部变量*default*,而并不是count。
// add.js
var count = 1
var *default* = count

export { *default* as default }
...

// index.js
import { default as count } from './add.js'
...
故CommonJs导入模块变量时,仅仅是值或者引用的拷贝。而ES6 Module导入的变量将始终绑定模块内部的变量,形成一种绑定关系(binding),注意export default导出的变量不会产生绑定关系,其原因是由于JavaScript语法糖的转换造成的。
# 循环依赖
循环依赖是指模块A依赖于模块B,同时模块B又依赖于模块A。日常开发中工程的复杂度上升到足够规模时,容易出现隐藏的循环依赖。
如下为CommonJs中的循环依赖,输出结果为module foo exports {} module bar exports bar.js。首先index.js导入并执行foo.js,foo.js导入并执行bar.js,然后bar.js中导入foo.js,由于已经导入过foo.js但是并未执行完毕,导出值此时为默认的空对象,打印结果bar.js执行完毕。最后执行权交回foo.js,打印结果流程结束。
// index.js
require('./foo.js')

// foo.js
const bar = require('./bar.js')

console.log('module bar exports ', bar)
module.exports = 'foo.js'

// bar.js
const foo = require('./foo.js')

console.log('module foo exports ', foo)
module.exports = 'bar.js'
;webpack打包上述代码,可简化为如下。当bar.js再次导入foo.js时,直接返回的是installedModules中的值,此时为空对象。
(function (modules) {
  var installedModules = {}

  function require(moduleId) {
    if (installedModules[moduleId]) {
      return installedModules[moduleId].exports
    }

    var module = (installedModules[moduleId] = {
      i: moduleId,
      exports: {},
    })

    modules[moduleId].call(module.exports, module, module.exports, require)

    return module.exports
  }

  return require('./index.js')
})({
  './bar.js': function (module, exports, require) {
    const foo = require('./foo.js')

    console.log('module foo exports ', foo)
    module.exports = 'bar.js'
  },

  './foo.js': function (module, exports, require) {
    const bar = require('./bar.js')

    console.log('module bar exports ', bar)
    module.exports = 'foo.js'
  },

  './index.js': function (module, exports, require) {
    require('./foo.js')
  },
})
如下为ES6 Module的循环依赖,输出结果为module foo exports undefined module bar exports bar.js。bar.js也无法获取到foo.js的导出值,与CommonJS默认导出空对象不同,此时为undefined。
// index.js
import foo from './foo.js'

// foo.js
import bar from './bar.js'

console.log('module bar exports ', bar)
export default 'foo.js'

// bar.js
import foo from './foo.js'

console.log('module foo exports ', foo)
export default 'bar.js'
利用ES6 Module的绑定特性,改造循环绑定。首先index.js导入并执行foo.js,foo.js导入并执行bar.js,bar.js导入foo.js,由于此时foo.js未执行完,foo仍然为undefined,然后bar.js导出函数,执行权交回foo.js,foo.js再导出函数,执行权交回index.js,最后执行foo函数,由于绑定关系会执行foo.js内函数,将invoked置为true,再执行bar.js函数,bar函数内部又再执行foo函数,但是由于foo.js内invoked为true,foo函数不在执行,故执行顺序为foo bar foo。
// index.js
import foo from './foo.js'

foo()

// foo.js
import bar from './bar.js'
var invoked = false

export default function () {
  if (!invoked) {
    invoked = true
    bar()
    console.log('module bar exports ', bar)
  }
}

// bar.js
import foo from './foo.js'

export default function () {
  console.log('module foo exports ', foo)
  foo()
}
# AMD
;AMD即支持浏览器端模块化的规范,其加载模块的方式是异步的,加载模块时不会影响后面的语句执行。RequireJS实现了AMD的规范。
如下定义了一个AMD模块,其中目录下包括index.html和index.js、foo.js、bar.js模块。require.js模块可为CDN方式引入,data-main指定主模块文件。
;require引入模块,参数分别为加载的模块数组、模块加载完成后执行的回调函数。
;define定义模块,参数分别为当前模块名、当前模块的依赖、模块的导出值(函数或者对象,若为函数则导出函数的返回值,若为对象则直接导出)。
;AMD与同步加载的模块标准相比语法显得冗长,其加载方式也不如同步清晰。
// index.html
...
<body>
  <p>hello world</p>
  <script src="./require.js" data-main="./index.js"></script>
</body>

// index.js
require.config({
  paths: {
    foo: './foo',
    bar: './bar',
  },
})
require(['foo'], function (foo) {
  console.log('module foo exports ', foo)
}, function (err) {
  console.log(err)
})

// foo.js
define('foo', ['bar'], function (bar) {
  console.log('module bar exports ', bar)
  return 'foo.js'
})

// bar.js
define('bar', function () {
  return 'bar.js'
})
# CMD
;CMD是另一种浏览器端模块化的规范,也是异步加载模块,SeaJs实现了CMD的规范。
;AMD的多个依赖模块的执行顺序和书写顺序并非一致,取决于网路速度,哪个先下载下来,哪个先执行,而主逻辑在所有依赖加载完成后才执行。
;CMD在遇到require语句时才执行对应的模块,其执行顺序和书写顺序是完全一致的。
;AMD是依赖前置,CMD则是就近依赖。RequireJS和SeaJs都是在执行模块前预加载了依赖的模块,只是所依赖模块的执行时机不同,RequireJs加载时执行,而Seajs是使用时执行。
;RequireJs使用依赖数组,根据配置信息查找每项对应的实际路径来预加载。而Seajs使用正则表达式捕捉内部的require字段,也根据配置信息查找文件的实际路径来预加载。
// index.html
...
<body>
  <p>hello world</p>
  <script src="./sea.js"></script>
  <script src="./index.js"></script>
</body>

// index.js
seajs.config({
  paths: {
    foo: './foo',
    bar: './bar',
  },
})
seajs.use(['foo'], function (foo) {
  console.log('module foo exports ', foo)
})

// foo.js
define(function (require, exports, module) {
  var bar = require('bar')

  console.log('module bar exports ', bar)
  module.exports = 'foo.js'
})

// bar.js
define(function (require, exports, module) {
  module.exports = 'bar.js'
})
# UMD
;UMD是一种JavaScript通用模块定义规范,其能够在JavaScript所有运行环境中运行。
# 单模块
# 非模块环境
非模块化环境一般通过全局对象挂载属性。其中foo.js为立即执行函数,factory工厂函数返回值挂载到全局对象上,root为全局对象,其值为window或者global,由运行环境决定。
// index.html
...
<body>
  <p>hello world</p>
  <script src="./foo.js"></script>
  <script src="./index.js"></script>
</body>

// foo.js
(function (root, factory) {
  root.foo = factory()
})(this, function () {
  return 'foo.js'
})

// index.js
console.log(foo)
# AMD
;AMD方式则要满足AMD规范。
// index.html
...
<body>
  <p>hello world</p>
  <script src="./require.js" data-main='./index.js'></script>
</body>

// index.js
require.config({
  paths: {
    foo: './foo',
  },
})
require(['foo'], function (foo) {
  console.log(foo)
}, function (err) {
  console.log(err)
})

// foo.js
(function (root, factory) {
  if (typeof define === 'function' && define.amd) {
    define('foo', factory)
  } else {
    root.foo = factory()
  }
})(this, function () {
  return 'foo.js'
})
# UMD
;UMD即支持非模块环境、CommonJS、AMD、CMD规范的模块。
// foo.js
(function (root, factory) {
  if (typeof module === 'object') {
    module.exports = factory()
  } else if (typeof define === 'function' && define.amd) {
    define('foo', factory)
  } else if (typeof define === 'function' && define.cmd) {
    define(function (require, exports, module) {
      module.exports = factory()
    })
  } else {
    root.foo = factory()
  }
})(this, function () {
  return 'foo.js'
})
# 多模块
;UMD模块依赖其他UMD模块时。
# AMD
// index.html
...
<body>
  <p>hello world</p>
  <script src="./require.js" data-main='./index.js'></script>
</body>

// index.js
require.config({
  paths: {
    foo: './foo',
    bar: './bar',
  },
})
require(['foo'], function (foo) {
  console.log('module foo exports ', foo)
})

// foo.js
(function (root, factory) {
  if (typeof define === 'function' && define.amd) {
    define('foo', ['bar'], factory)
  } else {
    root.foo = factory(root.bar)
  }
})(this, function (bar) {
  console.log('module bar exports ', bar)
  return 'foo.js'
})

// bar.js
(function (root, factory) {
  if (typeof define === 'function' && define.amd) {
    define('bar', factory)
  } else {
    root.bar = factory()
  }
})(this, function () {
  return 'bar.js'
})
# UMD
// foo.js
(function (root, factory) {
  if (typeof module === 'object') {
    var bar = require('./bar')

    module.exports = factory(bar)
  } else if (typeof define === 'function' && define.amd) {
    define('foo', ['bar'], factory)
  } else if (typeof define === 'function' && define.cmd) {
    define(function (require, exports, module) {
      var bar = require('bar')

      module.exports = factory(bar)
    })
  } else {
    root.foo = factory(root.bar)
  }
})(this, function (bar) {
  console.log('module bar exports ', bar)
  return 'foo.js'
})(
  // bar.js
  (function (root, factory) {
    if (typeof module === 'object') {
      module.exports = factory()
    } else if (typeof define === 'function' && define.amd) {
      define('bar', factory)
    } else if (typeof define === 'function' && define.cmd) {
      define(function (require, exports, module) {
        module.exports = factory()
      })
    } else {
      root.bar = factory()
    }
  })(this, function () {
    return 'bar.js'
  })
)
# 资源输入输出
# 概念
module:所有的js、css、png等文件都是module模块chunk:代码块,webpack打包过程中入口文件依赖的模块,模块再依赖其他模块,以上模块组成的集合被称为chunkbundle:包文件,webpack打包生成的源文件
;module、chunk、bundle实质就是同一套代码逻辑在不同转换场景下的不同名字。编写阶段,每一个单文件都是一个module模块。打包阶段,根据入口文件所依赖的所有模块组成的集合为chunk代码块。打包输出后每一个源文件都是bundle包文件。
形象化一个打包场景来描述上述概念,其中webpack.config.js配置文件如下,插件的作用仅是单独抽离出css文件。
// webpack.config.js
const MiniCssExtractPlugin = require('mini-css-extract-plugin')

module.exports = {
  entry: {
    index: './index.js',
    main: './main.js',
  },
  output: {
    filename: '[name].js',
  },
  module: {
    rules: [
      {
        test: /\.css$/,
        use: [MiniCssExtractPlugin.loader, 'css-loader'],
      },
    ],
  },
  plugins: [
    new MiniCssExtractPlugin({
      filename: '[name].css',
    }),
  ],
}
入口文件分别为index.js和main.js,其中index.js引入了index.css的样式和utils工具类的一个函数,mian.js是一个单独的模块。
// index.js
import './index.css'
import { log } from './utils.js'

log('index.js')

// index.css
p {
  background: blue;
}

// utils.js
export function log(val) {
  console.log(val)
}

// main.js
console.log('main.js')
注意可能由于部分插件和loader版本与webpack版本的依赖差异,导致打包出错,如下为可行的package.json文件。
// package.json
{
  ...
  "devDependencies": {
    "webpack": "4.29.4",
    "webpack-cli": "3.2.3",
    "css-loader": "^0.28.9",
    "mini-css-extract-plugin": "^0.5.0"
  }
}
执行打包命令完成,结果如下。

初始模块为index.css、utils.js、index.js和main.js,打包阶段index.js、index.css和utils.js均构成代码块chunk 0,main.js构成代码块chunk 1,打包输出后的index.css、index.js和main.js均为包文件。
—— module ———— chunk ———— bundle
 index.css                index.css
           \           /
 utils.js ——  chunk 0  —— index.js
           /
 index.js
 main.js  ——  chunk 1  —— main.js
# 入口 (entry)
;entry即入口文件路径,webpack基于此开始进行打包。
若传入一个字符串或字符串数组,chunk会被命名为main。
若传入一个对象,则每个属性的键会是chunk的名称。
# 字符串类型
module.exports = {
  entry: './index.js',
  ...
}
# 数组类型
module.exports = {
  entry: ['./main.js', './index.js'],
  ...
}
# 对象类型
module.exports = {
  entry: {
    index: './index.js',
    main: './main.js',
  },
  ...
}
# 函数类型
函数类型返回以上任意类型均可,其优点在于可在函数体内部添加部分动态逻辑来获取工程入口,函数也支持返回Promise对象来进行异步操作。
module.exports = {
  entry: () => './index.js',
}

module.exports = {
  entry: () =>
    new Promise((resolve, reject) => {
      setTimeout(() => {
        resolve('./index.js')
      }, 5000)
    }),
}
# 出口 (output)
# filename
即输出资源的文件名,其形式为字符串,可以为相对路径,若路径中的目录不存在则webpack在输出资源时会创建此目录。如下打包完成后会在根目录创建build文件夹。
module.exports = {
  ...
  output: {
    filename: '../build/index.js',
  },
}
;webpack也支持类似模板语言的形式动态地生成文件名。如下filename中的name会被替换为chunk name,即最终项目生成的资源是index.js和main.js。
module.exports = {
  entry: {
    index: './index.js',
    main: './main.js',
  },
  output: {
    filename: '[name].js',
  },
  ...
}
;filename部分常用配置项模板变量如下。其作用是当有多个chunk存在时对不同的chunk进行区分。另一个作用是控制客户端缓存,chunkhash与chunk内容直接相关,当chunk内容改变时同时会引起资源文件名的更改,用户在下一次请求资源文件时便会立即下载新的版本而不会使用本地缓存。
hash:webpack打包所有资源生成的hashid:当前chunk的idchunkhash:当前chunk内容的hash
# path
;path用于指定资源的输出路径,且值必须为绝对路径,如下将资源输出位置设置为工程的lib目录。webpack4+版本默认为dist目录,若非修改输出路径,否则不用单独配置。
const path = require('path')

module.exports = {
  ...
  output: {
    ...
    path: path.join(__dirname, 'lib'),
  },
}
# publicPath
;path用来指定资源的输出位置,publicPath用来指定资源的请求位置。
请求位置即由js或者css所请求的间接资源路径,诸如html加载的script,或者异步加载的js、css请求的图片等,publicPath即指定上述资源的请求位置。
形象化一个打包场景来描述上述情况,其中根目录下包括index.html、index.js等文件。index.html为模板文件,插件的作用是将打包后的js文件插入到模板中。
// index.html
<html lang="zh-CN">
  ...
<body>
  <div id="app">hello world</div>
</body>

</html>

// index.js
console.log('index.js')

// package.json
{
  ...
  "scripts": {
    "build": "webpack"
  },
  "devDependencies": {
    "webpack": "^4.29.4",
    "webpack-cli": "^3.2.3",
    "html-webpack-plugin": "^3.2.0"
  }
}

// webpack.config.js
const HtmlWebpackPlugin = require('html-webpack-plugin')

module.exports = {
  entry: './index.js',
  output: {
    filename: 'index.js',
    publicPath: '/lib/',
  },
  plugins: [
    new HtmlWebpackPlugin({
      template: './index.html',
    }),
  ],
}
运行npm run build打包后,当前根目录下生成dist文件夹,其中包括index.html和index.js。
// index.html
<html lang="zh-CN">
  ...
<body>
  <div id="app">hello world</div>
  <script type="text/javascript" src="/lib/index.js"></script>
</body>

</html>
;VS Code编辑器安装Live Sever插件,用来在本机上模拟index.html部署到服务器上的真实场景,index.html内部右击Open with Live Server开启本地服务,打开浏览器调试界面Network项,可查看如下js请求,其中Request URL即为资源的请求位置。
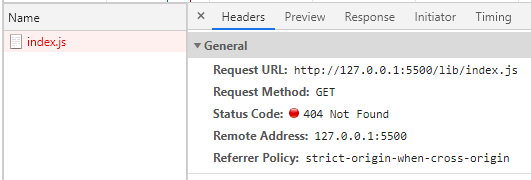
;publicPath的不同将最终导致资源的请求地址也不同,其中publicPath分为如下三种形式,当前index.html文件地址为http://127.0.0.1:5500/dist/index.html,资源名称为index.js。
html相关:资源路径与html文件目录关联,即资源路径为html目录路径加上publicPath和文件名
———— publicPath ———————— Request URL
     ''                  http://127.0.0.1:5500/dist/index.js
     './js'              http://127.0.0.1:5500/dist/js/index.js
     '../assets/'        http://127.0.0.1:5500/assets/index.js
- 根目录相关:若
publicPath以'/'开始,则资源路径以页面根目录路径为基础
———— publicPath ———————— Request URL
     '/'                 http://127.0.0.1:5500/index.js
     '/js'               http://127.0.0.1:5500/js/index.js
     '/dist/'            http://127.0.0.1:5500/dist/index.js
- 绝对路径:绝对路径的情况一般是将静态资源放在
CDN上面
———— publicPath ———————— Request URL
     'https://cdn.com/'  https://cdn.com/index.js
     '//cdn.com/'        http://cdn.com/index.js
# devServer.publicPath
;devServer的配置中也有publicPath,其作用是指定devServer的静态资源服务路径,或者说指定资源打包到内存中的位置。
当启动devServer资源会被打包到内存中,devServer会到内存中查找打包好的资源文件,然后再去本地目录中查找内容,devServer.contentBase可控制它去哪访问本地目录的资源。
;contentBase默认为当前的工作目录,若查找不到内存中的资源,则会到contentBase中查找。
若不指定devServer.publicPath,devServer会获取output.publicPath的值,为了避免开发环境和生产环境产生不一致,一般保持devServer.publicPath与output.publicPath相同,或者不指定devServer.publicPath。
# 预处理器
;webpack只能处理JavaScript和JSON文件,对于其他资源例如css、图片,或者其他的语法集ts等是没有办法加载的。loader让webpack能够去处理其他类型的文件,并将它们转换为webpack能够接收的模块加载进来,loader实质上是做一个预处理的工作。
每个loader本质上都是一个函数,大致形式为output = loader(input),input为即将被转换的模块,output为转换后的模块,使用babel-loader将ES6+代码转换为ES5时,上述形式为ES5 = babel-loader(ES6+)。loader可以是链式的,即某一个loader的输出可以作为其他loader的输入,其形式为output = loaderA(loaderB(input)))。
;loader包括test和use两个属性,test用于识别哪些文件会被转换,use定义在进行转换时应该使用哪一个loader。
# 配置项
# options
;loader通常会提供一些配置项,一般通过options来将其传入,具体的loader不同其提供的options也不同。
module.exports = {
  ...
  module: {
    rules: [
      {
        test: /\.js$/,
        use: {
          loader: 'babel-loader',
          options: {
            ...
          },
        },
      },
    ],
  },
}
# exclude/include
排除或包含指定目录下的模块,可接受正则表达式或文件绝对路径字符串。如下为排除node_modules下的模块。
{
  test: /\.js$/,
  exclude: /node_modules/,
  ...
}
;include表示只包含匹配到的模块,如下为只包含src目录。
{
  test: /\.js$/,
  include: /src/,
  ...
}
若include和exclude同时存在,exclude的优先级更高。如下表示排除node_modules下所有模块。
{
  test: /\.js$/,
  exclude: /node_modules/,
  include: /node_modules\/lodash/,
  ...
}
# resource/issuer
;resource是被加载者,而issuer是加载者,两者可用于更加精确地确定模块规则的作用范围。
如下为仅src目录下的js文件可以引用css。
{
  test: /\.css$/,
  use: ['style-loader', 'css-loader'],
  issuer: {
    test: /\.js$/,
    include: /src/,
  },
},
上述test、include、exclude配置项分布于不同层级上,可读性较差,更好的方式是添加resource对象将外层的配置包裹起来。
如下为除了node_modules下的js,其余js都能引用css文件。仅src目录下的css文件可以被引用。
{
  use: ['style-loader', 'css-loader'],
  issuer: {
    test: /\.js$/,
    exclude: /node_modules/,
  },
  resource: {
    test: /\.css$/,
    include: /src/,
  },
},
# enforce
用来指定loader的种类,只接收pre或post两种类型。webpack中loader执行顺序可分为pre(优先处理)、inline(其次处理)、normal(正常处理)、post(最后处理),上述直接定义的loader都属于默认normal类型,post和pre需使用enfore来指定。
如下表示eslint-loader将在所有正常的loader之前执行。实际不用指定enforce只要保证loader的执行顺序是正确的即可,配置enforce主要目的是使模块规则更加清晰可读。
rules: [
  {
    test: /\.js$/,
    enforce: 'pre',
    use: 'eslint-loader',
  },
],
# 常用 loader
# sass-loader
;sass-loader是scss类型文件的预处理器,处理其语法并编译为css。sass-loader核心依赖于node-sass,而node-sass又依赖于node,安装时注意node-sass与node之间的版本支持。
之后css-loader处理css的各种加载语法,将@imoprt或者url()函数转换为require。仅仅是把css模块加载到js代码中,并未实际使用。
最后由style-loader将js中的样式字符串包装成style标签插入页面。
上述处理场景如下,根目录包括index.js、index.scss、index.html、package.json等。
// package.json
{
  ...
  "scripts": {
    "dev": "webpack-dev-server",
    "build": "webpack"
  },
  "devDependencies": {
    "webpack": "4.29.4",
    "webpack-cli": "3.2.3",
    "webpack-dev-server": "3.1.14",
    "html-webpack-plugin": "3.2.0",
    "css-loader": "^0.28.9",
    "style-loader": "^0.19.0",
    "node-sass": "^4.7.2",
    "sass-loader": "^6.0.7"
  }
}

// index.scss
$color: red;

p {
  color: $color;
}

// index.js
import './index.scss'

// index.html
<html lang="zh-CN">
  ...
<body>
  <p>hello world</p>
</body>

</html>

// webpack.config.js
const HtmlWebpackPlugin = require('html-webpack-plugin')

module.exports = {
  entry: './index.js',
  output: {
    filename: 'index.js',
  },
  module: {
    rules: [
      {
        test: /\.scss$/,
        use: ['style-loader', 'css-loader', 'sass-loader'],
      },
    ],
  },
  plugins: [
    new HtmlWebpackPlugin({
      template: './index.html',
    }),
  ],
  mode: 'development',
}
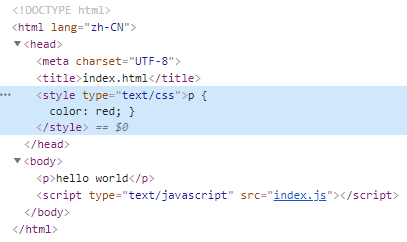
运行npm run dev,打开页面可查看css样式已经注入到html中了。
# babel-loader
;babel-loader用来处理ES6+并将其编译为ES5,使其能够在项目中使用最新的语言特性,也不用关注这些特性在不同平台的兼容性。
安装babel需同时安装babel-loader、@babel/core和@babel/preset-env。其中@babel/core是babel-loader依赖的核心模块,@babel/preset-env是官方推荐的预制器,可根据用户配置的目标浏览器或者运行环境自动添加所需的插件和补丁来编译ES6+代码,babel-loader作为中间桥梁调用@babel/core的api来告诉webpack要如何处理js。
{
  test: /\.js$/,
  loader: 'babel-loader',
  exclude: /node_modules/,
  options: {
    cacheDirectory: true,
    presets: [['@babel/preset-env', { modules: false }]],
  },
},
;babel-loader通常会编译所有的js模块,会严重拖慢打包速度,并且有可能改变第三方模块的原有行为,所以需要exclude排除node_modules。
;cacheDirectory启用缓存机制,当重复打包未改变过的模块时,将会尝试读取缓存,避免产生高性能的重新编译过程。cacheDirectory接收字符串类型的路径或者true,为true时将使用默认的缓存目录node_modules/.cache/babel-loader。
;@babel/preset-env会将ES6 Mudule转化为CommonJs,将导致webpack的tree-shaking失效,可设置modules为false关闭此行为,而将ES6 Module的转化交给webpack处理。
;babel-loader也支持外置.babelrc配置文件,将presets和plugins提取出来。
// .babelrc
{
  "presets": [
    [
      "@babel/preset-env",
      {
        "modules": false
      }
    ]
  ]
}
# url-loader
;url-loader用于打包文件类型的模块,对小于limit阈值的图片进行处理,并将其转换为base64编码。
将图片转换的base64编码引入代码中,可以减小请求次数提高页面性能。但是也会增加js或者html的文件体积,图片在项目中使用次数较多,每一个引用的地方都会生成base64编码,从而造成代码的冗余。另一方面浏览器可以缓存http请求的图片。因此需要平衡考虑,合理设置limit阈值。
{
  test: /\.(png|jpg|gif)$/,
  use: {
    loader: 'url-loader',
    options: {
      limit: 10240,
    },
  },
},
# file-loader
;file-loader也用于打包文件类型的模块,url-loader不能处理的大于阈值的图片交给file-loader处理,根据配置将资源输出到打包目录。
{
  test: /\.(png|jpg|gif)$/,
  use: [
    {
      loader: 'file-loader',
      options: {
        name: 'img/[name].[hash:8].[ext]',
      },
    },
  ],
},
# vue-loader
;vue-loader用来处理vue文件,提取出其中的template/script/style代码,再分别交给对应的loader处理。其中css-loader处理style样式代码,vue-template-compiler负责将template模板编译为render渲染函数,vue-loader默认支持ES6,每个vue组件可生成css作用域等。
使用vue-loader场景如下,根目录下包括index.html、index.js、App.vue等文件。
// package.json
{
  ...
  "scripts": {
    "dev": "webpack-dev-server",
    "build": "webpack"
  },
  "devDependencies": {
    "webpack": "4.29.4",
    "webpack-cli": "3.2.3",
    "webpack-dev-server": "3.1.14",
    "html-webpack-plugin": "3.2.0",
    "css-loader": "^0.28.9",
    "vue": "^2.5.13",
    "vue-loader": "^14.1.1",
    "vue-template-compiler": "^2.5.13"
  }
}

// index.js
import Vue from 'vue'
import App from './App.vue'

new Vue({
  el: '#app',
  render: h => h(App),
})

// index.html
<html lang="zh-CN">
  ...
<body>
  <div id="app"></div>
</body>

</html>

// App.vue
<template>
  <h1>{{ title }}</h1>
</template>

<script>
export default {
  name: 'App',
  data() {
    return {
      title: 'hello world',
    }
  },
}
</script>

<style lang="css">
h1 {
  color: blue;
}
</style>

// webpack.config.js
const HtmlWebpackPlugin = require('html-webpack-plugin')

module.exports = {
  entry: './index.js',
  output: {
    filename: '[name].js',
  },
  module: {
    rules: [
      {
        test: /\.vue$/,
        use: 'vue-loader',
      },
    ],
  },
  plugins: [
    new HtmlWebpackPlugin({
      template: './index.html',
    }),
  ],
  mode: 'development',
}
运行npm run dev,App.vue被挂载到了div#app元素上,h1中的模板也被渲染为hello world。
# 自定义 loader
# 初始化
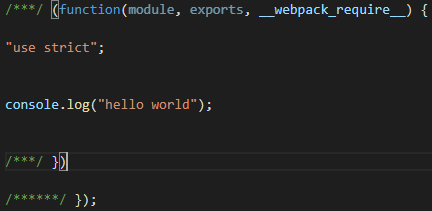
自定义实现一个loader,为所有js文件启用严格模式,即在其头部添加'use strict'。
创建strict-loader目录,执行npm init初始化目录,创建loader主体文件index.js。
// index.js
module.exports = function (content) {
  var useStrictPrefix = '"use strict"\n\n'

  return useStrictPrefix + content
}
;webpack工程引用strict-loader,其中use.loader通过绝对路径引用strict-loader,可以随时修改loader中的源码调试。
// webpack.config.js
module.exports = {
  entry: './index.js',
  output: {
    filename: '[name].js',
  },
  module: {
    rules: [
      {
        test: /\.js$/,
        use: {
          loader: 'F:/strict-loader',
        },
      },
    ],
  },
  devtool: 'none',
  mode: 'development',
}

// package.json
{
  ...
  "scripts": {
    "build": "webpack"
  },
  "devDependencies": {
    "webpack": "4.29.4",
    "webpack-cli": "3.2.3"
  }
}

// index.js
console.log('hello world')
工程执行npm run build,打包输出后的部分源码如下。
# 启用缓存
当输入的文件和其他依赖没有变化时,应该直接使用缓存,而不是重复进行转换的工作。
// strict-loader/index.js
module.exports = function (content) {
  if (this.cacheable) {
    this.cacheable()
  }

  var useStrictPrefix = '"use strict"\n\n'

  return useStrictPrefix + content
}
# options 参数
;loader配置项可通过use.options传递进来。需要安装loader-utils依赖库,用其提供的一些帮助函数。
npm i loader-utils@1.1.0 --save
;loader获取options方式如下。
// strict-loader/index.js
var loaderUtils = require('loader-utils')

module.exports = function (content) {
  ...
  var options = loaderUtils.getOptions(this) || {}

  console.log('options', options)
  ...
}
# 样式处理
# 分离样式文件
;style-loader将样式字符串包装为style标签插入页面,但是在生产环境则希望样式存在于css文件中而不是style标签中,因为文件更有利于客户端进行缓存。
;webpack4-主要采用extract-text-webpack-plugin插件用于提取样式到css文件。
# 单样式
根目录下包括index.html、index.js、index.css等文件。如下将index.js打包到index.html中,其中webpack.config.js中ExtractTextPlugin.extract中use用于指定在提取样式之前采用哪些loader来进行预处理,fallback用于指定当插件无法提取样式时所采用的loader,new ExtractTextPlugin参数定义输出文件的名称。
// webpack.config.js
const HtmlWebpackPlugin = require('html-webpack-plugin')
const ExtractTextPlugin = require('extract-text-webpack-plugin')

module.exports = {
  entry: './index.js',
  output: {
    filename: '[name].js',
  },
  module: {
    rules: [
      {
        test: /\.css$/,
        use: ExtractTextPlugin.extract({
          fallback: 'style-loader',
          use: 'css-loader',
        }),
      },
    ],
  },
  plugins: [
    new ExtractTextPlugin('index.css'),
    new HtmlWebpackPlugin({
      template: './index.html',
    }),
  ],
  mode: 'development',
}

// package.json
{
  ...
  "scripts": {
    "dev": "webpack-dev-server",
    "build": "webpack"
  },
  "devDependencies": {
    "webpack": "4.29.4",
    "webpack-cli": "3.2.3",
    "webpack-dev-server": "3.1.14",
    "html-webpack-plugin": "3.2.0",
    "css-loader": "^0.28.7",
    "style-loader": "^0.19.0",
    "extract-text-webpack-plugin": "^4.0.0-beta.0"
  }
}

// index.html
<html lang="zh-CN">
  ...
<body>
  <p>hello world</p>
</body>

</html>

// index.js
import './index.css'

// index.css
p {
  color: blue;
}
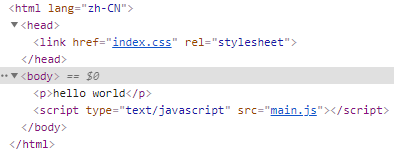
运行npm run dev,可查看提取的文件被引用至index.html中。
# 多文件
当存在多个入口文件,且不同入口文件引入了不同的css样式,提取多个css样式如下。其中根目录下包括foo.js、foo.css、bar.js和bar.css。
// foo.js
import './foo.css'

// foo.css
p {
  color: blue;
}

// bar.js
import './bar.css'

// bar.css
h5 {
  color: red;
}

// index.html
<html lang="zh-CN">
  ...
<body>
  <p>hello</p>
  <h5>world</h5>
</body>

</html>
;package.json依赖与单文件一致,webpack.config.js稍做调整。如下[name].css中的name指代的是chunk name,即entry为入口分配的名字(foo、bar)。
// webpack.config.js
module.exports = {
  entry: {
    foo: './foo.js',
    bar: './bar.js',
  },
  ...
  plugins: [
    new ExtractTextPlugin('[name].css'),
    ...
  ],
}
运行npm run dev,可查看提取的多文件被引用至index.html中。
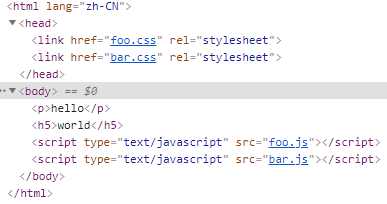
若index.js中通过import()异步加载了foo.js,foo.js中加载了foo.css,那么最终foo.css只能被同步加载,或者说只能被以style标签的方式插入到html中,无法做到按需加载。
# 按需加载
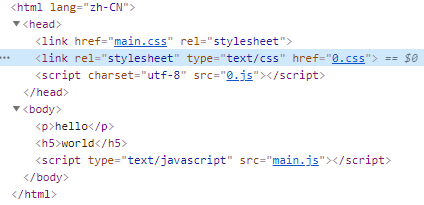
;Webpack4+则主要采用mini-css-extract-plugin提取css样式,可动态插入link标签的方式按需加载。
根目录下包括index.js、index.css、foo.js和foo.css等文件。
// webpack.config.js
const HtmlWebpackPlugin = require('html-webpack-plugin')
const MiniCssExtractPlugin = require('mini-css-extract-plugin')

module.exports = {
  entry: './index.js',
  output: {
    filename: '[name].js',
  },
  module: {
    rules: [
      {
        test: /\.css$/,
        use: [
          {
            loader: MiniCssExtractPlugin.loader,
          },
          'css-loader',
        ],
      },
    ],
  },
  plugins: [
    new HtmlWebpackPlugin({
      template: './index.html',
    }),
    new MiniCssExtractPlugin({
      filename: '[name].css',
      chunkFilename: '[id].css',
    }),
  ],
  mode: 'development',
}

// package.json
{
  ...
  "scripts": {
    "dev": "webpack-dev-server",
    "build": "webpack"
  },
  "devDependencies": {
    "webpack": "4.29.4",
    "webpack-cli": "3.2.3",
    "webpack-dev-server": "3.1.14",
    "html-webpack-plugin": "3.2.0",
    "css-loader": "^0.28.7",
    "mini-css-extract-plugin": "^0.5.0"
  }
}

// index.js
import './index.css'

setTimeout(() => {
  import('./foo.js')
}, 2000)

// index.css
p {
  color: blue;
}

// foo.js
import './foo.css'

// foo.css
h5 {
  color: red;
}

// index.html
<html lang="zh-CN">
  ...
<body>
  <p>hello</p>
  <h5>world</h5>
</body>

</html>
运行npm run dev,2s后head中将会动态插入link标签和script标签。
# postcss
;postcss-loader不算是css的预处理器,仅仅是一个运行插件的平台,其工作模式是接收样式源代码交由编译插件处理并输出css,其中编译插件可以通过配置来指定。
# postcss-loader
;postcss-loader可以单独使用或者与css-loader结合使用,当单独使用postcss-loader时,不建议在css中使用@import,否则会产生冗余代码。
;postcss-loader需要在css-loader和style-loader后使用,但是要在其他预处理程序(如sass-loader)之前使用它。
;postcss要求有一个单独的配置文件,需要在根目录下创建postcss.config.js,未添加任何特性暂时返回一个空对象即可。
// webpack.config.js
{
  test: /\.css/,
  use: ['style-loader', 'css-loader', 'postcss-loader'],
},

// package.json
"devDependencies": {
  ...
  "css-loader": "^0.28.7",
  "postcss-loader": "^2.1.2",
  "style-loader": "^0.19.0"
}

// postcss.config.js
module.exports = {}
# autoprefixer
;autoprefixer为css自动添加浏览器厂商前缀,根据 Can I Use (opens new window) 的数据决定是否为某一特性添加前缀。
根目录下包括index.css、index.html、index.js和postcss.config.js等。
// package.json
"devDependencies": {
  ...
  "autoprefixer": "^8.1.0"
}

// postcss.config.js
const autoprefixer = require('autoprefixer')

module.exports = {
  plugins: [
    autoprefixer({
      grid: true,
      browsers: ['> 1%', 'last 3 versions', 'ie 8'],
    }),
  ],
}

// index.css
div {
  display: grid;
}

// index.js
import './index.css'
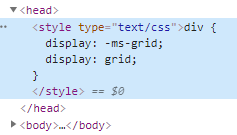
打包后为grid特性添加了IE前缀。
# stylelint
;stylelint是一个css的代码检测工具,类似eslint,可以为其添加各种规则来统一项目的代码风格质量。
;postcss.config.js和package.json、index.css部分如下,其中declaration-no-important用于对代码中!important样式给出警告。
// package.json
"devDependencies": {
  ...
  "postcss-loader": "^2.1.2"
}

// postcss.config.js
const stylelint = require('stylelint')

module.exports = {
  plugins: [
    stylelint({
      config: {
        rules: {
          'declaration-no-important': true,
        },
      },
    }),
  ],
}

// index.css
div {
  color: red !important;
}
执行打包时会在控制台输出如下警告信息。

# cssnext
;cssnext可以在项目中使用最新的css语法特性。
// package.json
"devDependencies": {
  ...
  "postcss-cssnext": "^3.1.0"
}

// postcss.config.js
const postcssCssnext = require('postcss-cssnext')

module.exports = {
  plugins: [
    postcssCssnext({
      browsers: ['> 1%', 'last 2 versions'],
    }),
  ],
}

// index.css
:root {
  --highlightColor: #666;
}

p {
  color: var(--highlightColor);
}
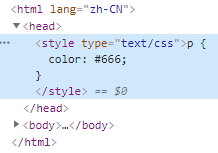
打包后的结果如下。
# CSS Modules
;CSS Modules是样式模块化解决方案,其中每个css拥有单独的作用域,不会和外界发生命名冲突,可以通过相对路径引入css模块,可以通过composes复用其他css模块。
;CSS Modules不用额外安装模块,开启css-loader的modules配置项即可。
其中localIndentName指明编译出的css类名风格,name代指模块名,local代指原本选择器标识符,hash:base64:5为5位hash值,此hash值根据模块名和标识符计算而来。
// webpack.config.js
{
  test: /\.css/,
  use: [
    'style-loader',
    {
      loader: 'css-loader',
      options: {
        modules: true,
        localIdentName: '[name]__[local]__[hash:base64:5]',
      },
    },
  ],
},

// index.css
.title {
  color: red;
}

// index.js
import style from './index.css'

document.write(`<div class='${style.title}'>hello wolrld</div>`)
打包后查看编译出的类名。

# 🎉 写在最后
🍻伙伴们,如果你已经看到了这里,觉得这篇文章有帮助到你的话不妨点赞👍或 Star (opens new window) ✨支持一下哦!
手动码字,如有错误,欢迎在评论区指正💬~
你的支持就是我更新的最大动力💪~
GitHub (opens new window) / Gitee (opens new window)、GitHub Pages (opens new window)、掘金 (opens new window)、CSDN (opens new window) 同步更新,欢迎关注😉~
